 Save
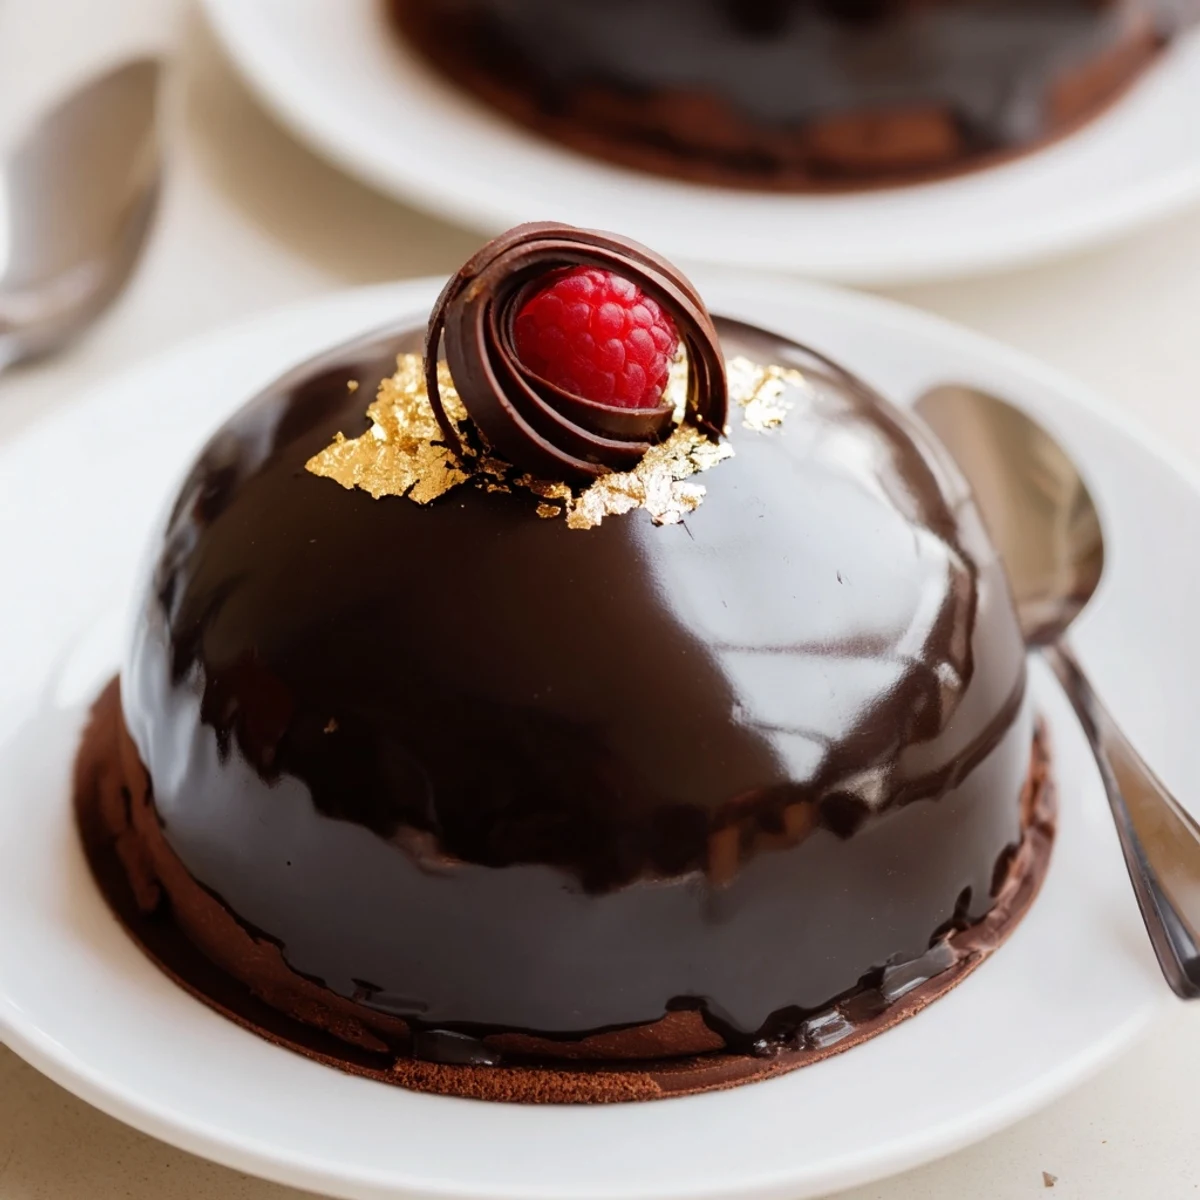
Save This elegant chocolate mascarpone dome combines a silky mascarpone mousse with crisp dark chocolate shells and a glossy mirror glaze. Brush two layers of tempered chocolate into silicone dome molds, chill until set, then pipe a gelatin-stabilized mascarpone mousse into each shell. Chill for several hours before unmolding. Pour mirror glaze at about 32°C for even coverage and finish with gold leaf or berries. Allow adequate chilling between stages for clean presentation and stable texture.
The first time I encountered this elegant chocolate mascarpone dome, it was the glint of the glossy, mirror-like shell that drew me in—not to mention the sound of delighted whispers as it appeared at the table. The sense of anticipation as you crack into the shiny surface is almost as irresistible as the creamy mousse inside. This dessert has become my way of bringing a bit of spectacle to ordinary evenings, a treat that always seems to start conversations and spark curiosity. There’s a sense of ceremony, even if the kitchen looks like a chocolate-splattered studio by the end.
I still remember serving these domes after a winter dinner, hands sticky with chocolate as I tried not to laugh at my crooked first shell. The table went quiet just for a moment as everyone admired their desserts, and then there was that collective gasp as spoons broke through the glaze. Sharing that surprise together made the extra effort feel entirely worthwhile. That sense of playful suspense is now a trademark of my dinner parties.
Ingredients
- Dark chocolate (at least 60% cocoa): The deeper flavor and snap are essential for a shell that holds up—temper it well, and don’t rush chilling, or you’ll get cloudiness.
- Mascarpone cheese, chilled: It’s the anchor of the mousse, so always use chilled mascarpone for smoothness; let it sit out for a few minutes to take the chill off for easier mixing.
- Heavy cream, cold: Whip it cold for those dreamy soft peaks—it brings luscious body to your mousse.
- Powdered sugar: Easily dissolves into the mascarpone, giving you a mousse that’s sweet but never grainy.
- Vanilla bean paste or extract: Adds depth and a hint of floral perfume—a small but mighty detail.
- Gelatin: Whether you use sheets or powder, bloom it well and dissolve fully to avoid any rubbery bits.
- Water (for blooming gelatin): Cold water helps the gelatin hydrate gently—lukewarm can make it lumpy.
- Cocoa powder, sifted: Sifting gives you an extra-smooth glaze without stray clumps.
- Sugar: Creates that perfect shine in the glaze and balances out the bittersweet notes.
- Gold leaf, chocolate curls, or fresh berries (optional): Little touches for drama—pick whatever you feel elevates the moment or use nothing for minimalist chic.
Instructions
- Melt and Paint Chocolate Shells:
- Set the chopped chocolate in a heatproof bowl and gently melt over simmering water, or microwave in short bursts until glossy. Paint the inside of your dome molds with a generous layer, being careful not to miss the edges, chill for 10 minutes, and repeat for a sturdy shell—chill again for 30 minutes until the shell is set with a satisfying snap.
- Make Mascarpone Mousse:
- Soften the gelatin in cold water (5 minutes for leaves or follow your packet for powder), and set aside. In your biggest bowl, whisk together mascarpone, powdered sugar, and vanilla until smooth—then in a separate bowl, whip your cold cream to soft, fluffy peaks and fold gently into the mascarpone mixture for airy silkiness.
- Incorporate Gelatin:
- Melt the soaked (or bloomed) gelatin by gently heating till it's clear and liquid, then fold into the mousse quickly but carefully, so the mixture stays light. Spoon or pipe the mousse into the chocolate shells, smoothing the tops, and refrigerate for at least 3 hours, allowing patience to do its magic.
- Unmold the Domes:
- Once completely set, carefully unmold each dome—it’s normal if your hands tremble a little with anticipation—and set them on a wire rack over a tray.
- Create Glossy Mirror Glaze:
- Bloom gelatin with cold water, then simmer water, sugar, cream, and sifted cocoa powder in a saucepan, whisking until no lumps remain. Take off the heat, cool briefly, then stir in the softened gelatin until dissolved; let the glaze cool to 32°C before pouring for the shiniest finish.
- Glaze and Decorate:
- Pour the glossy glaze evenly over each dome, letting it cascade and drip—it's poetry you can eat. Transfer the coated domes to dessert plates, adorn with your favorite decorations, and chill for another half hour before serving to let everything set to perfection.
 Save
Save I’ll never forget the first time a friend took a photo of their dome mid-bite, chocolate glaze glinting in the lamplight, and sent it to our group chat with the caption 'how did you do this?' In that little moment, I realized that desserts like this aren’t just about flavor—they’re about making memories and sharing delight, spoonful by glossy spoonful.
A Few Words on The Right Tools
Using silicone dome molds changed everything for me—you won’t believe how much easier it is to get those perfect, seamless domes. Have a wire rack and a sturdy tray for glazing and drip-catching, and if you don't have a thermometer, invest in one: nailing the glaze temp is worth it.
What To Do With Leftover Chocolate
Leftover melted chocolate? Swirl it onto a parchment sheet, sprinkle on nuts or dried fruit, and you’ve got an instant bark to snack on while you clean up. Chocolate never ends up wasted at my place, even if it winds up as midnight spoonfuls straight from the bowl.
Personal Celebrations and Last Touches
These domes always remind me to embrace a sense of play—sometimes I sneak edible gold leaf on just one dome for a surprise 'golden ticket.' Sharing that little in-joke with my guests makes it all the more special. And yes, even a tiny crack in the shell is a badge of the homemade touch—nobody minds at all.
- If your glaze thickens too much, a short blast in the microwave brings it back to pouring glory.
- A steady hand and confident pour make all the difference when glazing—hesitation can cause uneven patches.
- Don't be afraid to decorate boldly or keep it minimalist—the real magic is inside that chocolate shell.
 Save
Save If you’re looking for an excuse to make a dessert that feels like a small celebration, this is it. Every spoonful is proof that kitchen risks can lead to moments of genuine joy.
Common Questions
- → How thick should the chocolate shells be?
-
Brush two to three thin layers of melted chocolate, chilling between coats. Aim for an even shell about 2–3 mm thick so it holds the mousse without becoming clumsy to bite through.
- → Can I swap gelatin for a vegetarian alternative?
-
Yes. Use agar-agar as a vegetarian gel: dissolve according to package directions and test set strength, as agar firms more quickly and yields a slightly different texture than gelatin.
- → What temperature is best for pouring the mirror glaze?
-
Cool the glaze to roughly 30–33°C (86–91°F). At this range it flows smoothly, adheres to the domes, and sets to a glossy finish without melting the mousse inside.
- → Any tips for unmolding the domes cleanly?
-
Chill the filled shells until fully set and very cold. Gently flex the silicone mold and lift from the rim; if needed, briefly warm the outside of the mold with your hands to release edges without melting the shell.
- → How long can finished domes be stored?
-
Store covered in the refrigerator for up to 48 hours. Glazed domes are best within a day for shine; keep them chilled and avoid strong odors or moisture that can dull the glaze.
- → How can I vary the flavor profile?
-
Add a thin layer of coffee-soaked sponge or a fruit gelée at the base before sealing, fold a liqueur into the mousse, or swap dark chocolate for white chocolate shells and adjust the glaze for contrasting color.
